How to Encapsulate a Crawl Space Yourself: A Realistic DIY Guide
A DIY crawl space encapsulation project can save you $2,000–$4,000 compared to hiring a contractor - but only if your crawl space is physically accessible, has no active mold or water intrusion, and you're comfortable spending a weekend in a tight, dirty space.
Honest difficulty rating: Moderate to Hard
Physical demands are high (confined space, crawling on knees, dust/insulation). Technical difficulty is low. The job is slow, not complicated.
Before You Start: Go / No-Go Checklist
DIY encapsulation is appropriate if all of the following are true:
- Your crawl space has at least 18 inches of clearance (24"+ is much more manageable)
- There is no active mold requiring professional remediation
- There is no active water intrusion (standing water, water entering through walls)
- You do not need a dehumidifier with a new electrical circuit (that requires an electrician)
- Your foundation vents can be sealed without structural modification
If any of these are not true, get contractor quotes. The cost savings disappear quickly when remediation, electrical, or access complications enter the picture.
Materials List and Cost
| Item | What to Buy | Approximate Cost (1,500 sq ft) |
|---|---|---|
| Vapor barrier liner | 16-mil reinforced polyethylene, full coverage + 20% overage | $400–$700 |
| Butyl tape | 4" wide, at least 200 linear feet | $80–$150 |
| Termination bar | Aluminum, for attaching liner to walls | $60–$100 |
| Masonry anchors | Tapcon 3/16" or equivalent | $30–$50 |
| Vent covers (foam) | Rigid foam cut to fit each vent opening | $50–$120 |
| Drainage matting (optional) | Only if water intrusion is a risk | $200–$400 |
| Safety gear | N95 mask, knee pads, Tyvek suit, headlamp | $50–$100 |
| Total (no dehumidifier) | $870–$1,620 |
Where to buy: ACF Environmental, Crawl Space Depot, or Home Depot/Lowe's for materials. Buy from a specialty supplier for the liner - big box store liner is typically 6-mil, which is inadequate for a permanent installation.
Step-by-Step Installation
Step 1: Prepare the crawl space
Before laying any liner, the crawl space must be clean and ready. Remove all old vapor barrier material, debris, and organic material from the floor. If there's standing water, pump it out and wait for the soil to dry. Level any sharp gravel or rocks that could puncture the liner.
Inspect the floor joists and subfloor for visible mold. If you see mold covering more than a square foot or two, stop and get a professional assessment before proceeding.
Step 2: Install drainage matting (if needed)
If your crawl space has a history of water intrusion - even occasional - lay dimple board (drainage matting) before the liner. The textured side faces down, creating channels that direct water to a low point (ideally a sump pit). This protects the liner from water pressure and prevents the liner from floating in a wet event.
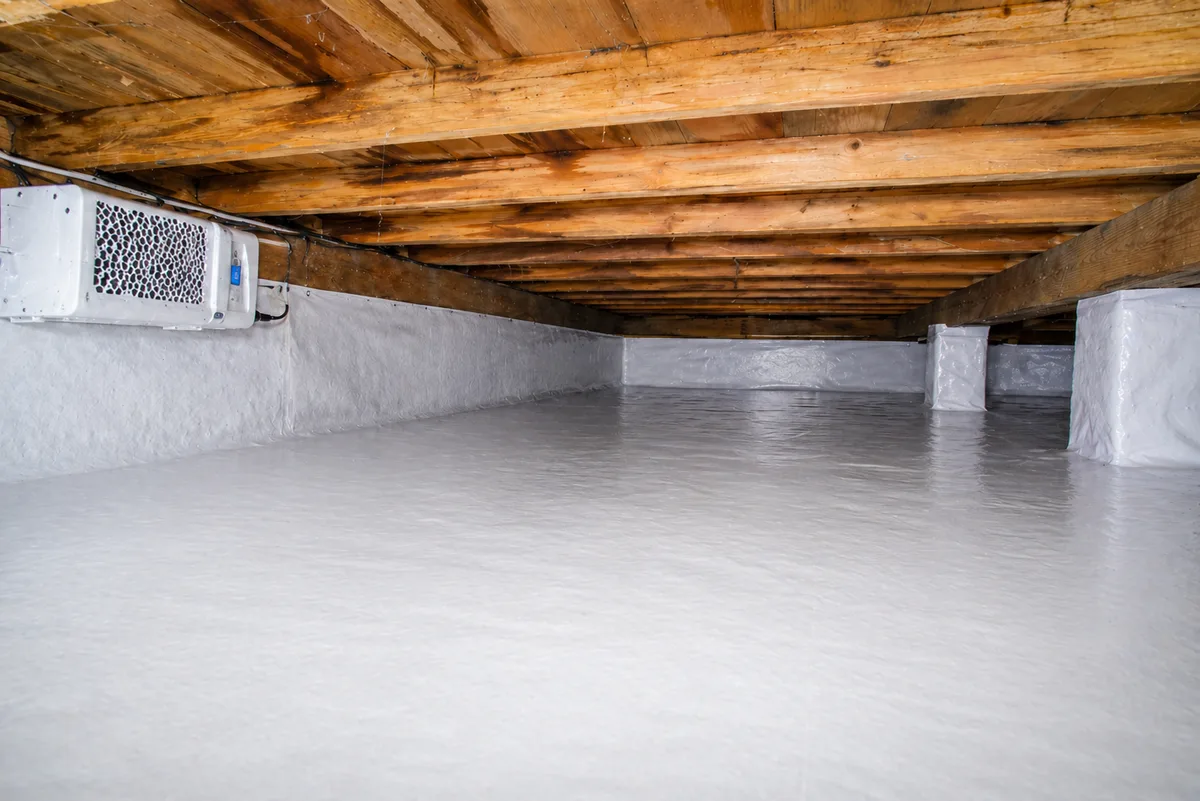
Step 3: Lay the vapor barrier
Start at one end and unroll the liner across the floor. Overlap seams by at least 12 inches - 18 inches is better. Wrap the liner around floor piers, cutting carefully and taping around the perimeter of each pier. Work toward the crawl space access opening so you're not stepping on freshly laid material.
Step 4: Seal all seams with butyl tape
Every overlap, every seam, and every penetration (pipes, piers, columns) must be sealed with 4-inch butyl tape. Do not use duct tape or regular plastic tape - they fail within a year. Butyl tape is specifically formulated to adhere to polyethylene and stay flexible in temperature extremes.
Press the tape firmly with a roller or your hand. Smooth out any air pockets.
Step 5: Run the liner up the walls
Bring the liner up each foundation wall at least 6 inches - ideally 12 inches. Some installers run it all the way to the sill plate. Attach it to the wall using a termination bar (a flat aluminum strip) fastened with masonry anchors every 12 inches. This is the most physically demanding part: you're working in a tight space, drilling into concrete block or poured concrete.
Step 6: Seal foundation vents
Cut rigid foam board (2-inch polyiso or XPS) to fit each vent opening. Install from the inside of the crawl space, securing with foam adhesive and sealing the perimeter with spray foam or butyl tape. This converts your vented crawl space to a closed one, which is required for the encapsulation to function in humid climates.
Note: Sealing vents may require a building permit in some jurisdictions. Check with your local building department before proceeding.
Step 7: Install a dehumidifier (strongly recommended)
A sealed crawl space without active humidity control can still accumulate moisture, especially during the first summer after installation. A commercial-grade crawl space dehumidifier - sized for your square footage, with a gravity drain or condensate pump - is the difference between a good system and a great one.
If your crawl space doesn't have a dedicated electrical circuit, hire an electrician for this part. A dehumidifier running on an overloaded circuit is a fire hazard.
What to Expect After Installation
In the first 2–4 weeks after installation, you may see a temporary increase in humidity as the system reaches equilibrium and residual soil moisture is pulled out. This is normal. After that, with a properly sized dehumidifier running, you should see relative humidity stabilize below 60% year-round.
Inspect the system annually: check for liner tears, seam lifting, dehumidifier filter condition, and any new water intrusion.
Prefer to hire a contractor?
Use our calculator to get a fair estimate for your square footage and state before you talk to anyone.
Get a free cost estimate →